
Join on WhatsApp
Get the latest updates directly on WhatsApp – motivation, news & more!
 Join On WhatsApp
Growing mushrooms at home is a fascinating and rewarding hobby that is gaining popularity among gardeners and food enthusiasts alike. Unlike traditional gardening, mushroom cultivation doesn’t require sunlight or a large outdoor space, making it ideal for small apartments or homes. If you’re new to mushroom growing, this guide will walk you through everything you need to know to get started successfully.
Understanding Mushrooms and Their Growth
Mushrooms are fungi, not plants, which means they grow very differently from typical garden vegetables or fruits. They reproduce through spores instead of seeds, and their main growth body is an underground network called mycelium. The mushrooms you see above ground are just the fruiting bodies of this extensive mycelium network.
Successful mushroom cultivation depends on providing the right environment for mycelium to grow and eventually produce mushrooms. This means controlling factors like moisture, temperature, light, and the growing medium. Different types of mushrooms have varying needs, so knowing the basics is essential before you start.
Choosing the Right Mushroom Variety for Beginners
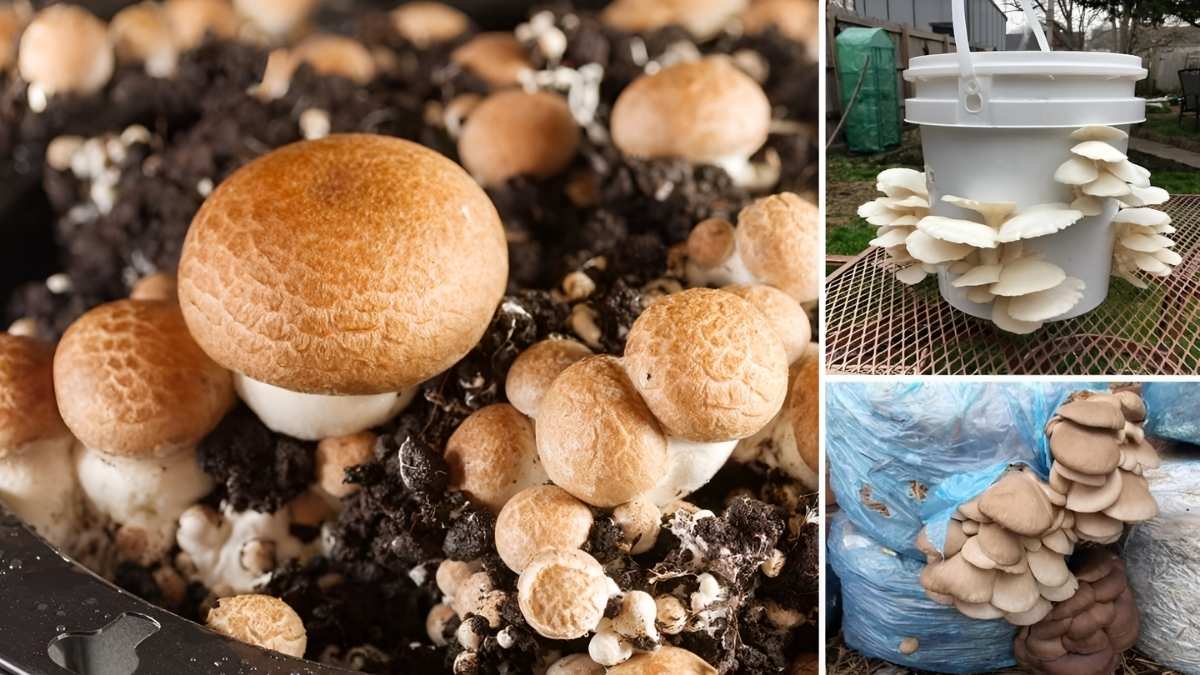
For beginners, some mushroom varieties are easier to grow than others. Oyster mushrooms and white button mushrooms are among the most popular for home cultivation due to their adaptability and forgiving nature.
Oyster mushrooms grow quickly and can thrive on a wide range of substrates like straw, coffee grounds, or sawdust. They tolerate a variety of temperatures and produce large, tasty mushrooms.
White button mushrooms, the most common in supermarkets, grow on composted manure and require a bit more precision with temperature and humidity but are still manageable for beginners.
Avoid exotic or gourmet mushrooms like morels or truffles initially, as they often require complex growing conditions that can be challenging to replicate at home.
Preparing Your Growing Space
Mushrooms require a clean, humid environment with good air circulation but minimal direct airflow that could dry them out. Depending on your chosen mushroom variety, this could be a small indoor space like a basement, a spare closet, or even a dedicated mushroom growing tent.
You don’t need sunlight, but indirect light helps trigger fruiting for some species. Temperature control is important most beginner mushrooms prefer a range between 55°F and 75°F. If your home fluctuates widely, consider using a humidity tent or a simple humidifier to maintain moisture levels around 80 to 90 percent.
Cleanliness is crucial because molds and other fungi can easily contaminate your mushroom substrate. Make sure your growing area is disinfected and avoid touching the substrate or mushrooms with dirty hands.
Selecting and Preparing Substrate
The substrate is the material on which mushrooms grow and get their nutrients. The choice of substrate depends largely on the type of mushroom you want to grow.
Oyster mushrooms do well on straw, coffee grounds, sawdust, or even cardboard. White button mushrooms prefer composted manure or a mixture of straw and manure.
To prepare your substrate, it often needs to be pasteurized or sterilized to kill off competing organisms. Pasteurization can be done by soaking the substrate in hot water (around 160°F) for an hour or more. Sterilization requires higher temperatures and pressure, typically achieved with a pressure cooker.
Proper substrate preparation is one of the keys to a successful mushroom crop and helps prevent contamination.
Inoculating Your Substrate with Mushroom Spawn
Mushroom spawn is the equivalent of seeds in traditional gardening but contains the living mycelium. There are several types of spawn available, including grain spawn, sawdust spawn, and plug spawn. For beginners, grain or sawdust spawn is often easiest to work with.
To inoculate your substrate, mix the spawn evenly throughout the prepared material in a clean environment. This allows the mycelium to colonize the substrate more quickly and uniformly. After inoculation, place the substrate into growing containers like plastic bags, buckets, or trays with small holes to allow for air exchange.
Seal the containers loosely or cover with breathable material to maintain humidity while allowing fresh air to enter.
Incubation and Colonization
Once inoculated, the substrate needs to be kept in the right conditions to allow the mycelium to grow and colonize the entire medium. This phase is called incubation.
Keep the substrate in a dark or dimly lit area with stable temperatures suitable for your mushroom species. During colonization, you’ll notice white, thread-like growth spreading through the substrate. This process can take anywhere from 2 to 6 weeks depending on the mushroom type and growing conditions.
It’s important to keep the substrate moist but not waterlogged during incubation. Mist with water if necessary, and maintain good but gentle airflow to avoid the buildup of carbon dioxide, which can slow growth.
Initiating Fruiting
After the substrate is fully colonized, it’s time to trigger fruiting, which is when the mushrooms start to form. This usually involves changing environmental conditions such as lowering the temperature, increasing humidity, and introducing indirect light.
Many growers move their colonized substrate to a fruiting chamber or a more open environment. Mist the substrate regularly to keep humidity high and provide fresh air to encourage healthy mushroom development.
Fruiting can occur within a few days to a week after these changes, and mushrooms can grow surprisingly fast, sometimes doubling in size daily.
Harvesting Your Mushrooms
Harvesting is straightforward pick the mushrooms when their caps begin to flatten out but before they start releasing spores. Use a clean knife or twist and pull gently to avoid damaging the mycelium, which can produce additional flushes of mushrooms.
Most mushroom crops produce several flushes of fruit over weeks, so don’t discard your substrate after the first harvest. Continue to mist and care for it until production slows down.
Proper harvesting not only ensures the best flavor and texture but also maximizes your yield over time.
Common Challenges and How to Avoid Them
Growing mushrooms isn’t always smooth sailing, especially for beginners. Common challenges include contamination by mold or bacteria, substrate drying out, or poor fruiting due to incorrect environmental conditions.

To avoid these issues, prioritize cleanliness, proper substrate preparation, and monitoring of temperature and humidity. If you spot green, black, or fuzzy molds, remove the contaminated substrate immediately to prevent spread.
Patience and observation are key mushrooms respond quickly to changes in their environment, so adjustments may be needed to optimize growth.
Why Grow Your Own Mushrooms?
Growing mushrooms at home offers many benefits. Fresh mushrooms are incredibly flavorful and nutritious, often superior to store-bought varieties. Home cultivation also allows you to experiment with unique types that may be hard to find locally.
Additionally, mushroom growing is eco-friendly. Using agricultural waste like straw or coffee grounds as substrate recycles materials that would otherwise be discarded.
For many, mushroom growing is also a relaxing, educational hobby that connects them with nature in a unique way.
Final Thoughts
Starting mushroom cultivation can seem intimidating at first, but with the right knowledge and patience, anyone can grow delicious mushrooms at home. By understanding the life cycle of mushrooms, selecting the right species, and controlling their environment, you’ll be on your way to a fruitful and rewarding mushroom harvest.
Experiment with different substrates and mushroom varieties to discover what works best for you. With practice, mushroom growing becomes a fun and sustainable part of your gardening routine.